How to change from IMAP to POP3 account
Converting from an IMAP account to POP3 account will mitigate the server from administering the emails of user. Reason being with POP3 account, mails gets saved on the user’s system locally. The conversion of IMAP account to POP3 accounts is mentioned clearly in the following steps.
Step 1. Add a POP3 Account
To add a POP3 Account Please see Our blog How to Setup Outlook 2010 (POP3) in few clicks
After Adding POP3 Account Please follow the steps below
Step 2: Move the Mail Folders
After the user’s account has been added as a POP3 account, all the emails which are present in the Inbox folder of the IMAP account will start downloading. But, the contents from sent items and additional sub-folders created by users won’t get downloaded. It is because POP3 protocol provides for downloading the messages from the inbox folder only.
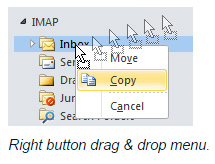
To Move your data, simply select the messages or folders that you want to have in your POP3 mailbox and initiate a copy or move command or use the drag & drop method. If you drag & drop mails or folders via your right mouse button, you’ll get an option to either move or copy the selected items.
Note -> You cannot move or copy the Inbox or Sent Items folders since these are special folders. To move these items, you’ll have to select the messages instead of the folder.

To keep the original structure of messages intact, users can first clear out the contents of POP3 account. The status of all the messages like read or unread will remain unchanged even after transferring the contents to the new account. This act is done to avoid any duplicate messages in the inbox.
The smoothest way to move the Calendar items at once is by placing Calendar folder in a list view. For example- All Appointments list view or category view. Then move the items by selecting them (via CRTL+A) and then apply drag & drop option.
Step 3. Remove your current IMAP account
After all the messages are copied to POP3 account mailbox, the IMAP account can be removed by accessing the Account Settings option.
In case of Outlook 2013, proper steps should be taken to ensure that the PST file of the POP3 account is placed as default store before aiming to remove the IMAP account. This can be done by selecting “Data” option, then choose POP3 mailbox store that contains the PST file and finally click on the option “Set as Default.”
It should be noted that it is mandatory to restart the system in case of Outlook 2013 while switching the default mailbox store from IMAP to POP3 account. After the system restarts, users can move to the Account Settings option again and remove the IMAP account successfully.
Like Us on Facebook:
Follow Us on Linkedin:
If you are looking for a web design dubai based company for your website design work, then you must contact us for a better web design deal. Choosing your web design dubai based company really matters for your company web design work.


